Who can sign up to be a user?
Under Access Control you find all settings regarding who can register to use your schedule(s) and what the registration process will look like. This includes which steps a new user should complete when signing up and which information they should provide in the process.
Note that it is also possible to allow people to book appointments without registering at all. In that case you do not need the settings on this page and you can skip to the next section. However, unless users are required to register, several features will be unavailable, such as the ability to track their booking history.
Who can register?
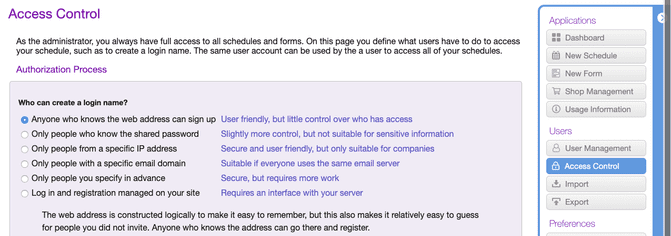
There are six options to control access to your schedule(s), ranging from open to very restrictive.

The most common (and most user-friendly) option is to allow anyone who knows how to navigate to your schedule to register as a user. If you use your schedule for commercial purposes, this is probably the option you want to use.
As an aside, if you already let your users register and login on your own website, it would be possible to set up a so-called single sign-on and automatically log them in at SuperSaaS as well. This avoids the need for your users to log in twice. If your website is based on Drupal, Joomla! or WordPress, our free plugins help you set this up. Otherwise, an interface to your back-end systems would need to be custom-built using the documentation for programmers.
If you would like to restrict access to specific users and/or user groups, you have four more options to choose from:
- Shared password – only users who know the shared password can log in. Although this option helps prevent random visitors to your schedule from gaining access, there is no way to block access for a particular user once they know the shared password.
- Specific IP address – IP filtering is only suitable if all potential users access the internet through a single gateway, i.e. all employees of a company. Once a user has created a login name while inside the IP range, he can also use it while outside the IP range. Under User Management it is possible to manually add users outside the IP range.
- Specific email domain – this is suitable for organizations, who have their own email domain. Upon creating a login name, new users receive an email with a verification link that they need to click. Under User Management, users with different email addresses can be added manually.
- Specific users – instead of having users create their own login names and passwords, this option lets the administrator (or superuser) do this. This can be done either manually via User Management or from a CSV file via Import
Collecting user details upon registration
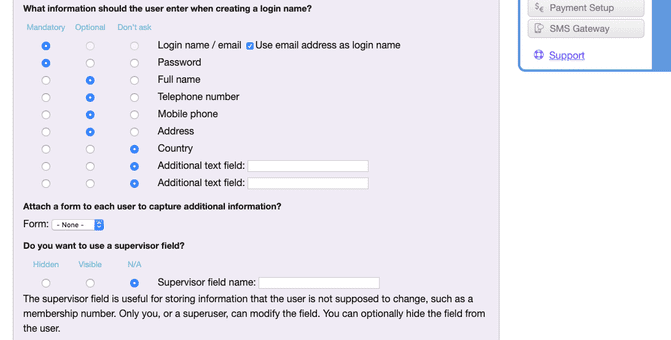
Upon registration, you can collect additional information from users. Besides the typical login name and password, you can ask for further information such as users’ contact details. Two additional text fields are available to collect any remaining information you might need. And if you require more information still, you can attach your own custom form to the registration process.

Each of the information fields that you set to Required or Optional will appear on the sign-up form for a new user. Setting a field to Required ensures that people cannot leave the field empty, while Optional shows the field but allows it to remain empty. Fields marked as Don’t ask do not appear on the sign-up form at all. Note that even the Password field can be switched off. Doing so will remove the password field from the login dialog for your schedule.
Users can change this information later on by clicking on the Your settings link in the upper-right corner of the screen. This link will only show when users are logged in. You can also block users from updating their own information (see Other settings below).
In addition to the standard contact detail fields, you can use two additional text fields to collect custom information. If you enable one or both of these fields, they will also become available for use in the booking dialog that can be configured via Configure > Process.
If you need to add more than two custom text fields or if you would like to use checkboxes or dropdown menus you could use a custom form instead. Once you have created such an integrated form (see Adding booking forms), you can add it to the registration process. You connect a form to your registration process from the dropdown menu under Attach a form to each user to capture additional information?.
You can also add a “supervisor field”, a field that only you, or a superuser, can edit. If the supervisor field does not contain confidential information it can also be shown to the user by setting it to . For more information of the Supervisor field and its uses, please refer to the User Process section.
Registration confirmation and verification
By default, no confirmation of registration is provided to new users. Upon completion of the registration process, they are immediately logged in to your system and can start using your schedule(s). By selecting , you ensure that the SuperSaaS system sends new users a confirmation email. The content of this email can be customized under Layout Settings (see also Layout). If, on top of confirming registrations to new users, you would like to be notified of new registrations, you need to check .

To discourage unwanted visitors from signing up, you can require them to verify their email address by selecting . This weeds out people using fake or invalid email addresses, as they won’t receive the notification email and thus cannot activate their user account.
To understand what the registration process looks like to new users, you can check the flowchart on the page. It instantly reflects any changes you make to the settings. For example, if you select the option , the flowchart will update to show a step that says that the IP address will be checked. Note that this is only the registration process; there is another flowchart that shows the booking process under Configure > Process.

Other settings
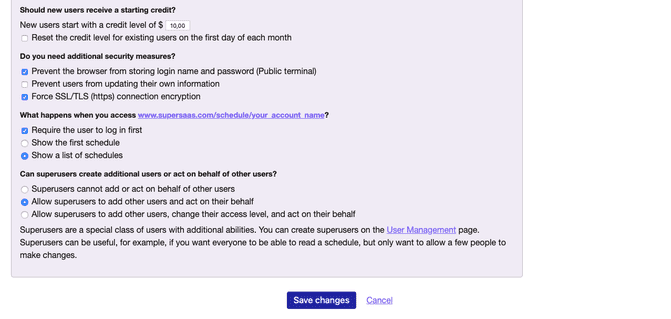
At the bottom of the Access Control page, three more sets of registration/authorization related settings can be found. The first setting can be used to provide new users with a starting credit upon registration. Note that this option is only available when the credit system has been enabled. For more information see the documentation for the credit system.

The second set of settings allows you to implement additional security measures such as preventing browsers from storing login names and passwords. Here you can also block users from updating the information they provided upon registration (see above). You can also find an option here that will prevent using your schedule on an http connection. In that case users will be automatically forwarded to an https version of the page. You can read more about the importance of securing your connection in this blog on HTTPS security.
If you have multiple schedules in your account then you will see a set of settings that allows you to show a list of available schedules to your users. There is also a setting that allows you to specify that users need to log in before they can see that list. This option is useful in combination with User Groups, see that page for a full explanation. The final set of settings determines whether superusers can create additional users and act on their behalf (see also Daily Use for tips on how to put these settings to good use).